I am completely obsessed with dreamcatchers and the Native American culture. So, recently (throughout the summer...) I have been making dreamcatcher, after dreamcatcher, after dreamcatcher. Which most of them I gave away to family and friends. Buuuuut, they are so easy to make, you wouldn't even believe me.
Here's a quick how to:
WHAT YOU'LL NEED:
Metal ring
old t-shirt
embroidery thread
large needle
feathers
charms/ beads
I bought metal rings from my local craft store, they were located in the leather section of our local Hobby Lobby. I use these to make the circle that catches your dreams.
Metal ring
old t-shirt
embroidery thread
large needle
feathers
charms/ beads
I bought metal rings from my local craft store, they were located in the leather section of our local Hobby Lobby. I use these to make the circle that catches your dreams.
FIRST: Wrap the ring with some fabric ( I just used an old t-shirt) and make sure you cover the entire ring. I cut the fabric into anywhere between 1/2 inch to 1 inch wide strips. Then start at the top of the ring and leave about 1 1/2 inches up off the ring so you can tie the fabric to together once you wrap the fabric completely around the ring.
SECOND: Once the ring is wrapped and the excess fabric at the top is tied together, I started the weave with embroidery thread. I just bought thread from the craft store also, and this thread is commonly used for friendship bracelets. With the thread I started the weave at the top where I tied the knot for the fabric that was wrapped around the ring. Now this is the trickiest part of the entire project. This picture explains it perfectly and I will post a video that can help you step by step also.


FOURTH: You can add feathers, beads, charms, whatever floats your boat! I added feathers to EVERY single one that I made except for one, which had seashells instead.
Here are some of my creations!


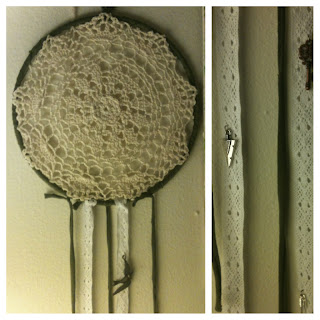
For this dreamcatcher I used a lace doily as the weave. I tied the doily to the ring after wrapping it with a t-shirt and then added the charms and feathers to the lace strips in the bottom.

This is a close up of the bottom of the lace dreamcatcher.

This one's my favorite, I used a piece of vine as the ring and then tied the weave all the way around the vine. I added an arrowhead charm to the weave then stuck feathers into the vine instead of adding strands at the bottom.


This one I made for my sister, she loves the beach and sea shells, so I had to make her a beach themed dreamcatcher for college.


These two were practice dreamcatchers before I made the vine one.

This one was difficult. I was trying not to use glue to make the antlers stay together so it isn't the most stable dreamcatcher I have. But I did the same general weave as the rest and then added the feathers to the bottom.

And lastly, another doily dreamcatcher in dark green.
I hope that these helped get your creative juices flowing! They're fun to make and look nice when they're hung up. Good luck!
Love, Sarah


